
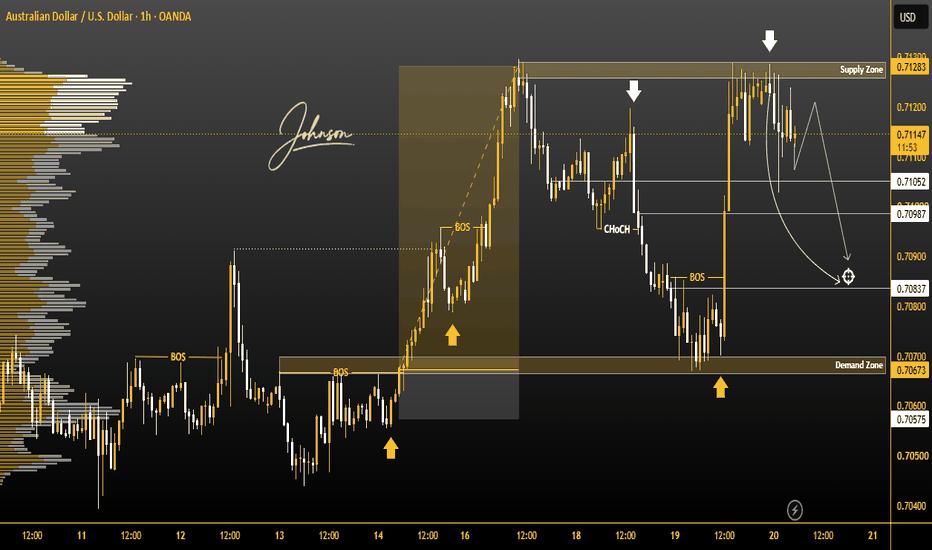
AUDUSD AUDUSD is currently trading in an important area where both the Demand Zone and Supply Zone are showing strong market reaction. This suggests that price may continue to respect these zones and move between them until a clear breakout or breakdown occurs.
On the 1H timeframe, traders should carefully monitor price action around these key zones. A strong rejection from the Demand Zone could support a bullish reaction, while rejection from the Supply Zone may create selling pressure.
🎯 Potential Downside Targets
Target 1: 0.71000
Target 2: 0.70900
Target 3: 0.70800
These targets can become active if bearish momentum develops and price continues moving lower from the current zone.
Market Structure
Pair: AUDUSD
Timeframe: 1H
Key Areas: Strong Demand & Supply Zones
Market Condition: Range / Zone Reaction
Targets: 0.71000 → 0.70900 → 0.70800
⚠️ Trade Confirmation
Do not rely on the zone alone. Wait for 1H price action confirmation, rejection, or a clear structural shift before taking a position. A sudden breakout can invalidate the current zone-to-zone setup.
إخلاء المسؤولية: الآراء الواردة هنا تعبر فقط عن رأي الكاتب، ولا تمثل الموقف الرسمي لـ Followme. لا تتحمل Followme مسؤولية دقة أو اكتمال أو موثوقية المعلومات المُقدمة، ولا تتحمل مسؤولية أي إجراءات تُتخذ بناءً على المحتوى، ما لم يُنص على ذلك صراحةً كتابيًا.